For reading this first time it might take around 15 min, afterward, it should take 2 to 5mins. But if you are already familiar with the concepts of load/stress generation on the target server, then you can directly jump to the try-at-home source code section here.
Visit this page for JUnit5 (opens in a new tab) Jupiter parallel load generation. Super easy! Give it a try!
Why using an IDE ?
Performance testing could be simple, easy and flexible to match our project need if it is based from our IDE!
IDE is e.g. Eclipse, IntelliJ or VSCode etc.
It's easy to fit into our CI Build pipe line due to simplicity of maven/gradle and JUnit based project.
- Download or Browse Demo Test Maven project (opens in a new tab) section towards the trail of this page
There are many standalone tools available in the market which we need to install and configure in order to generate load. But we need to spent much time in installing and learning the product on Windows/Mac/Linux, to be able to fire tests in parallel, and not so easy to fit into our CI Build pipe line .
JUnit framework already provides various mechanisms to run the tests in parallel e.g. ParallelComputer (opens in a new tab) class or fork-options-and-parallel execution in the Sure-Fire (opens in a new tab). These mechanisms also helps we to fire all tests in the suite in parallel and at the same time, as we can set it up simply inside a maven plugin; we don't need the pain of installing standalone or fancy products to this job.
Flexibility
Furthermore when it comes to running a business scenario test-case, we still need this be more flexible in terms of changing the payload, configuring it easily, picking and firing a particular test(s) at a particular time intervals, asserting the result, chaining one or more business test cases, running the tests for a certain configurable amount of time and retrieve an useful report and be able to share it with the stakeholders about the behaviour of the system under load/stress.
This is where an extended custom JUnit runner specifically designed to do this job, can make our life easy.
The load test class which does the job of generating the load, looks like the following-
@LoadWith("our_load_config.properties")
@TestMapping(testClass = AnyTestEndPoint.class, testMethod = "anyTestMethod")
@RunWith(ZeroCodeLoadRunner.class)
public class LoadTest {

}
In essence the performance testing is all about :
-
Load vs Stress, Horizontal Load vs Vertical Load (opens in a new tab)
-
How to run a test in parallel in the context of a scenarios or usecase ? (opens in a new tab)
-
How to run the tests in a gap of configurable amount of time ? (opens in a new tab)
-
How to dynamically change the payload for every request during the load ? (opens in a new tab)
-
How to assert the result once the response is received ? (opens in a new tab)
-
How to configure number of users to be launched in parallel ? (opens in a new tab)
-
How to configure how long the tests to be run? (opens in a new tab)
-
How to increase or decrease load gradually? (opens in a new tab)
-
How to reuse our existing test to feed it to generate load? (opens in a new tab)
-
And how to achieve/run the above by using our IDE e.g. Eclipse or IntelliJ etc? (opens in a new tab)
-
JUnit5 Jupiter automated load generation and testing (opens in a new tab)
Let's address one by one of the above aspects in detail in the following section.
Load vs Stress, Horizontal Load vs Vertical Load
In a nutshell :
- Load: Generate more parallel requests on the application server
- Monitor the system behaviour making large number of concurrent users fire the requests.
- Stress: In a single request, pass a heavy payload
- Monitor the system is behaviour with making our payload largest
- Horizontal: Generate more parallel requests on the application server
- Monitor the system behaviour making large number of concurrent users fire the requests.
- Vertical: In a single request, pass a heavy payload
- Monitor the system is behaviour with making our payload largest
How to run tests in parallel in context of one or more scenarios ?
Annotate our load test class with :
@RunWith(ZeroCodeLoadRunner.class)Here, the JUnit runner org.jsmart.zerocode.core.runner.parallel.ZeroCodeLoadRunner picks the JUnit test anyTestMethod from AnyTestEndPoint class and generates load configured in the properties file our_load_config.properties i.e. fires the test in parallel the number of times.
The test class looks like below:
import org.junit.Test;

public class AnyTestEndPoint {

    @Test
    public void anyTestMethod() throws Exception {
       ...
    }
}
The properties needed are as follows-
# We can enter as many threads to stimulate a load test. A single user is represented by each Thread. So if we wish
# to simulate a load test with 5 concurrent users then we need to enter 5 as the value for this property. A high end
# machine will be able to spawn more number of threads. To keep the consistent(or nearly consistent) gap between the
# threads, adjust this number with 'ramp.up.period.in.seconds' and the actual response time of the API end point.
# For "@RunWith(ZeroCodeMultiLoadRunner.class)", set this to at least equal to number of "@TestMapping" or more,
# otherwise there wont be enough threads to run each test.
number.of.threads=2

# It indicates the time taken to create all of the threads needed to fork the requests. If we set 10 seconds as the
# ramp-up period for 5 threads then the framework will take  10 seconds to create those 5 threads, i.e. each thread
# will be at work appx 2 secs gap between the requests. Also by setting its value to 0 all the threads can be created
# at once at the same time. Note- If we want to fire more threads/user-requests in less ramp up time e.g. 5 threads
# in 2secs(or 5 threads in 1 sec), then, use '@UseHttpClient(SslTrustHttpClient.class)' as this closes the connection
# before making the next connection.
ramp.up.period.in.seconds=10

# By specifying its value framework gets to know that how many times the test(s), i.e. the number of requests will be
# repeated per every 'ramp.up.period.in.seconds'.
# Supposing number.of.threads = x, ramp.up.period.in.seconds = y, loop.count = i
# then (x * i) = number of requests will be fired over (y * i) seconds. If x=5, i=3, y=20, then 15 requests will be
# fired in 60 seconds which means- every request in 4 seconds gap. 60/15 or 20/5 = 4seconds.
loop.count=1

# If we have set the loop count to a higher digit which e.g. should take 3hrs(3*60*60=10800sec),
# but due to load or network delay it could take more time(we are speculating) e.g. 4hrs, then we can
# set this abort value to 3hrs i.e. 3*60*60=10800sec.
abort.after.time.lapsed.in.seconds=600
How to run tests in a gap of configurable amount of time ?
The our_load_config.properties file defines the load we want to generate on the server.
e.g.
- If
number.of.threads=2,ramp.up.period.in.seconds=10, then the gap between the test invocation is 5secs. - If
number.of.threads=2,ramp.up.period.in.seconds=4, then the gap between the test invocation is 2secs. - If
number.of.threads=10,ramp.up.period.in.seconds=10, then the gap between the test invocation is 1sec. - If
number.of.threads=10,ramp.up.period.in.seconds=5, then the gap between the test invocation is 0.5sec. - If
number.of.threads=10,ramp.up.period.in.seconds=2, then the gap between the test invocation is 200milisec.
How to dynamically change the payload for every request during the load ?
Suppose we have a payload in the request block below to invoke POST method using url /api/v1/abc-bank/employees.
So the test case looks like:
        {
            "name": "create_emp",
            "url": "/api/v1/abc-bank/employees",
            "method": "POST",
            "request": {
                "body": {
                    "id": "EMP-300000001",
                    "name": "Sindrella Holmes",
                    "address": "Piscataway, NJ Turn Pike, ZIP-300009"
                }
            }
        }
We are using this payload to load-test our POST end point i.e. load-testing the createEmployee feature.
This load needs to be dynamic in terms of id, name, address every time test is fired.
- Let's make the
iddifferent every time the test runs! To achieve this, use:
"id": "EMP-${RANDOM.NUMBER}"
or
"id": "EMP-${RANDOM.UUID}"
where the full test case will actually look like below which asserts the result status to 201 every time it runs:
        {
            "name": "create_emp",
            "url": "/api/v1/abc-bank/employees",
            "method": "POST",
            "request": {
                "body": {
                    "id": "EMP-${RANDOM.NUMBER}",
                    "name": "Sindrella Holmes",
                    "address": "Piscataway, NJ Turn Pike, ZIP-300009"
                }
            },
            "verify": {
                "status": 201
            }
}- To make the
namedifferent every time the test test runs, Use:
"name": "Sindrella ${RANDOM.STRING}"
- To make the
addressdifferent every time the test test runs, Use:
"address": "Piscataway, ${RANDOM.STRING}, ZIP-${RANDOM.NUMBER}"
How to assert the result once the response is received ?
e.g. if the response of our API produces the following-
{
    "status": 201,
    "body": {
        "id": "EMP-300000001"
    }
}
Then, we simply put our expectations into the verify section as below-
{
    ...
    "verify": {
        "status": 201,
        "body": {
            "id": "EMP-300000001"
        }
    }
}
and the entire test case looks like following-
        {
            "name": "create_emp",
            "url": "/api/v1/abc-bank/employees",
            "method": "POST",
            "request": {
                "body": {
                    "id": "EMP-300000001",
                    "name": "Sindrella Holmes",
                    "address": "Piscataway, NJ Turn Pike, ZIP-300009"
                }
            },
            "verify": {
                "status": 201,
                "body": {
                    "id": "${create_emp.request.body.id}"
                }
            }
        }
where ${create_emp.request.body.id} resolves to EMP-300000001. But we can simply put EMP-300000001 too
How to configure number of users to be launched in parallel ?
The
number.of.threads=2above creates number of users.
We can configure as many threads to simulate a load test. A single user is represented by each Thread. So if we wish to simulate a load test with 10 concurrent users then we need to enter 10 as the value for this property. A high end machine will be able to spawn more number of threads. To keep the consistent(or nearly consistent) gap between the threads, we need to adjust this number with ramp.up.period.in.seconds and the actual response time of the API end point, which we will get to know better in couple of dry runs.
How to configure how long the tests to be run?
ramp.up.period.in.seconds=10 loop.count=1 in combination will decide how long the tests will run. This means- if we set
loop.count=5andramp.up.period.in.seconds=60, then the load test will run60x5=300seconds(5mins) firing in totalnumber.of.threads x 10test requests.
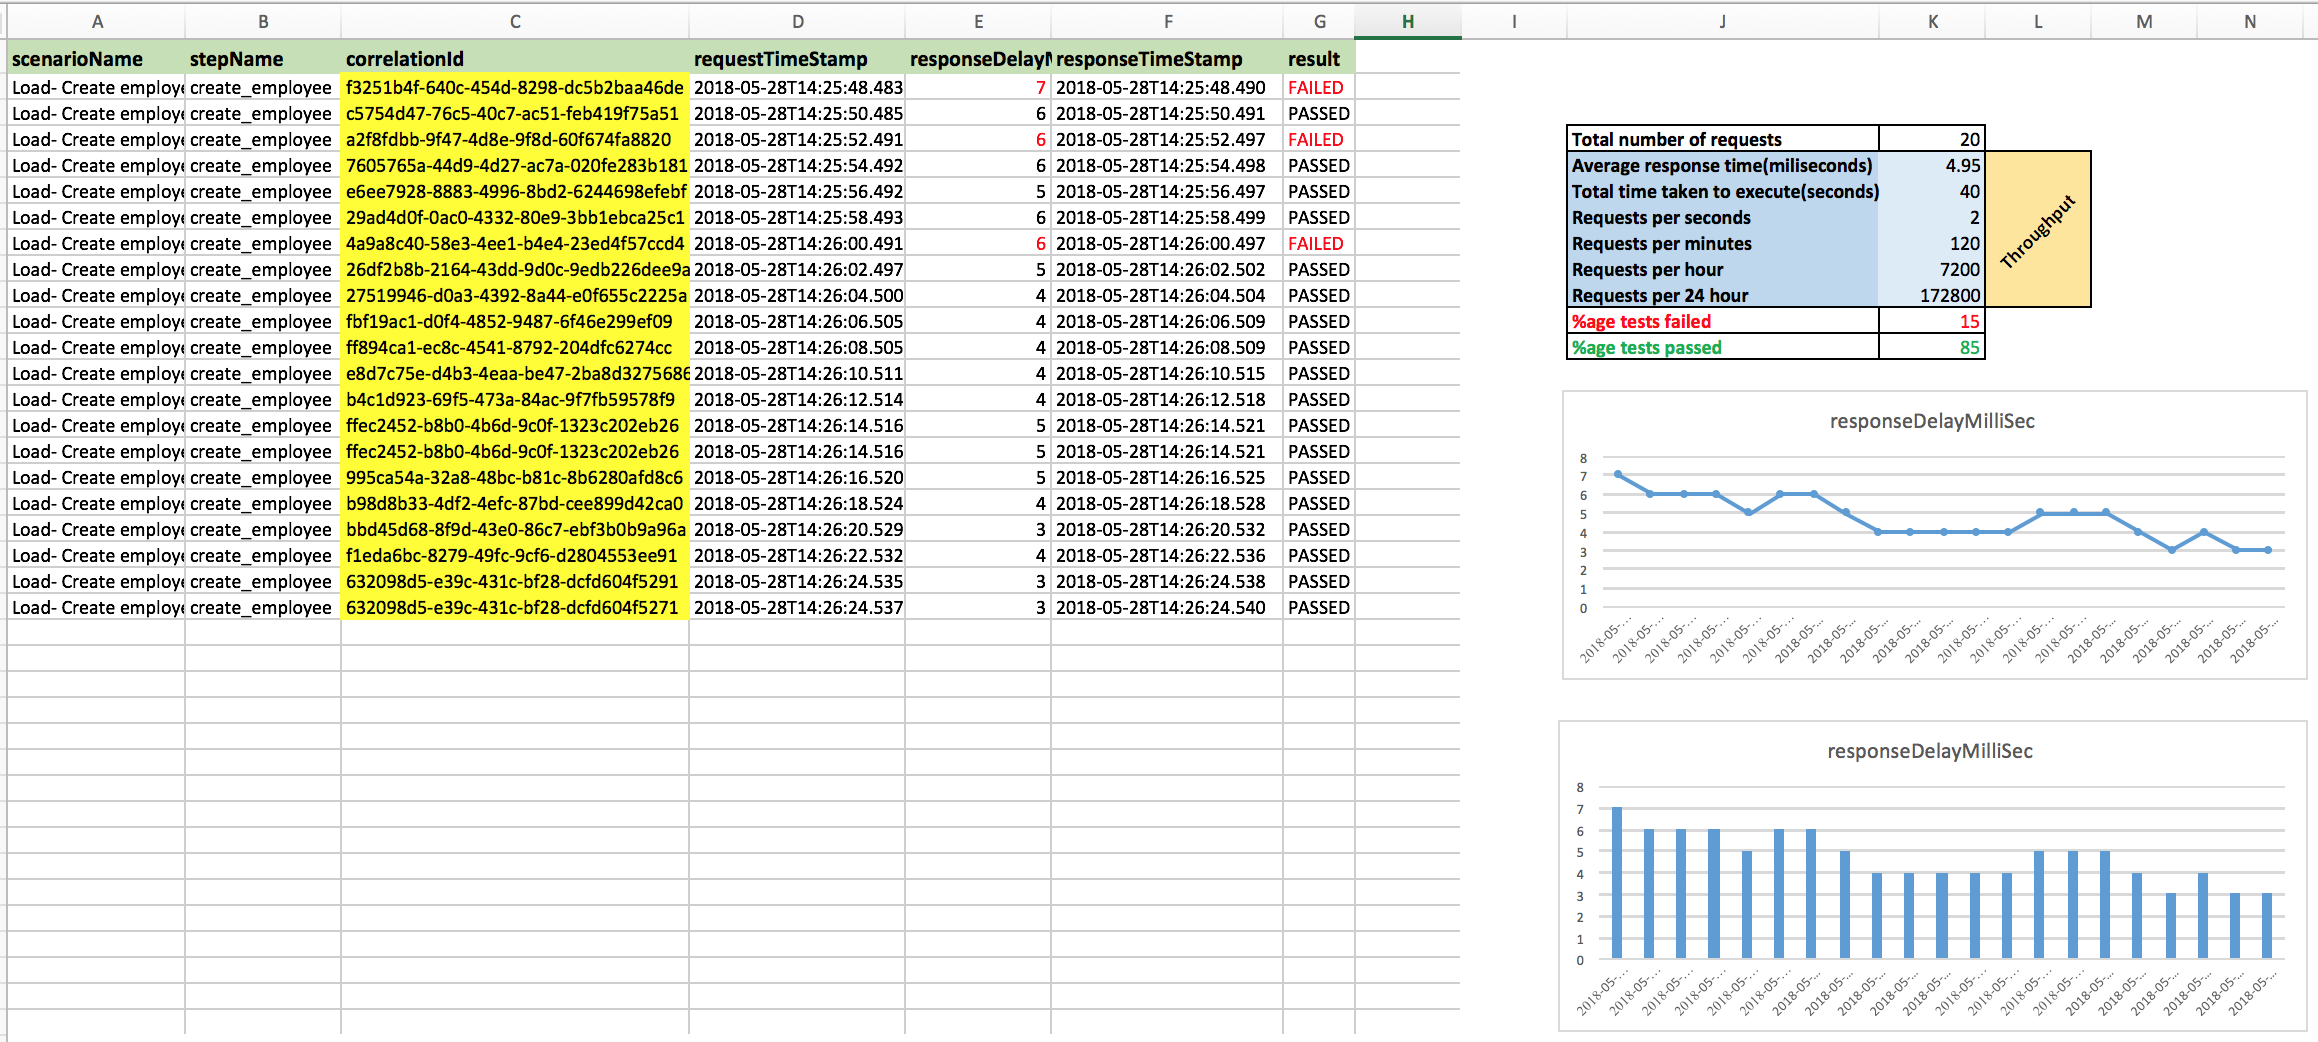
How to generate useful report(s) or statistics to explain the behaviour of the system under test?
The test reports are generated under /target folder with name zerocode-junit-granular-report.csv which attaches a correlation-id to each test it runs. If more number of steps are run for each scenario, attaches a correlation-id to each step making our life easier to track which test/step failed for what reason.
A sample load report looks like this in CSV format (opens in a new tab), but when we draw charts/graphs we get a fancy looks along with a throughput statistics, a sample one looks like this (download and view in MS Excel) (opens in a new tab)
How to reuse our existing test to feed it to generate load?
If we have an existing test case e.g. a POST call or a scenario with POST, PUT then GET, then we can simply feed this test into the load runner as below-
@TestMapping(testClass = ourExistingTest.class, testMethod = "testPost")
or
@TestMapping(testClass = ourExistingTest.class, testMethod = "testPostPut_thenGet")
, existing test is-
@HostProperties(host="https://api.ourserver.com", port=443, context = "")
@UseHttpClient(SslTrustHttpClient.class)
@RunWith(ZeroCodeUnitRunner.class)
public class ourExistingTest {

    @Test
    @JsonTestCase("all_tests/post_api_existing_test.json")
    public void testPost() throws Exception {

    }

    @Test
    @JsonTestCase("all_tests/post_put_get_api_existing_test.json")
    public void testPostPut_thenGet() throws Exception {

    }

}
and the load test will be as following:
@LoadWith("our_load_config.properties")
@TestMapping(testClass = ourExistingTest.class, testMethod = "testPost") //or testMethod = "testPostPut_thenGet"
@RunWith(ZeroCodeLoadRunner.class)
public class LoadTest {

}
And finally how do we run the load-test using our IDE e.g. Eclipse or IntelliJ etc?
- Simply right click on the
LoadTestclass and run as JUnit. (Eclipse) - Click on the tiny play arrow besides the
LoadTest, then pressRun(IntelliJ)
Note-
Before running the load test, please make sure we are able to run the unit test successfully which we intend to feed to the load runner(in this case @Test annotated testPost method of ourExistingTest.class).
Hope this wiki page helps us in doing our performance testing easy, accurate and fun!
For any queries please write to author.japps@gmail.com
Download or browse demo project
Try-At-Home Examples
- Browse
or
or
- Download the demo maven performance-test project (opens in a new tab) and run a sample load test via your IDE.
Run
org.jsmart.zerocode.samples.load.parallelget.LoadGetTest
using simple maven command e.g.
mvn test -Dtest=org.jsmart.zerocode.samples.load.parallelget.LoadGetTest
Disabling Report Generation During Large Scale Load Testing
interactive.html.report.disabled=trueEssentially for largescale load testing, the above configuration tells the framework/library "Do not generate reports". Mainly due to the fact that, report generation (large scale) is a time and resource/memory consuming tasks.
Visit this Blog for some use load testing use cases: https://medium.com/@igorvlahek1/load-testing-with-junit-393a83261745 (opens in a new tab)